Advanced Workflows#
This guide covers advanced workflows and techniques for power users who want to maximize their efficiency with SysGit. These capabilities go beyond basic requirements management and system modeling to address the needs of large programs, complex organizational structures, and users who want to leverage SysGit's full power.
Package-Based Organization#
As systems grow in complexity, organizing model elements into logical packages becomes essential. Packages provide namespace separation, access control boundaries, and team focus areas.
Understanding Packages#
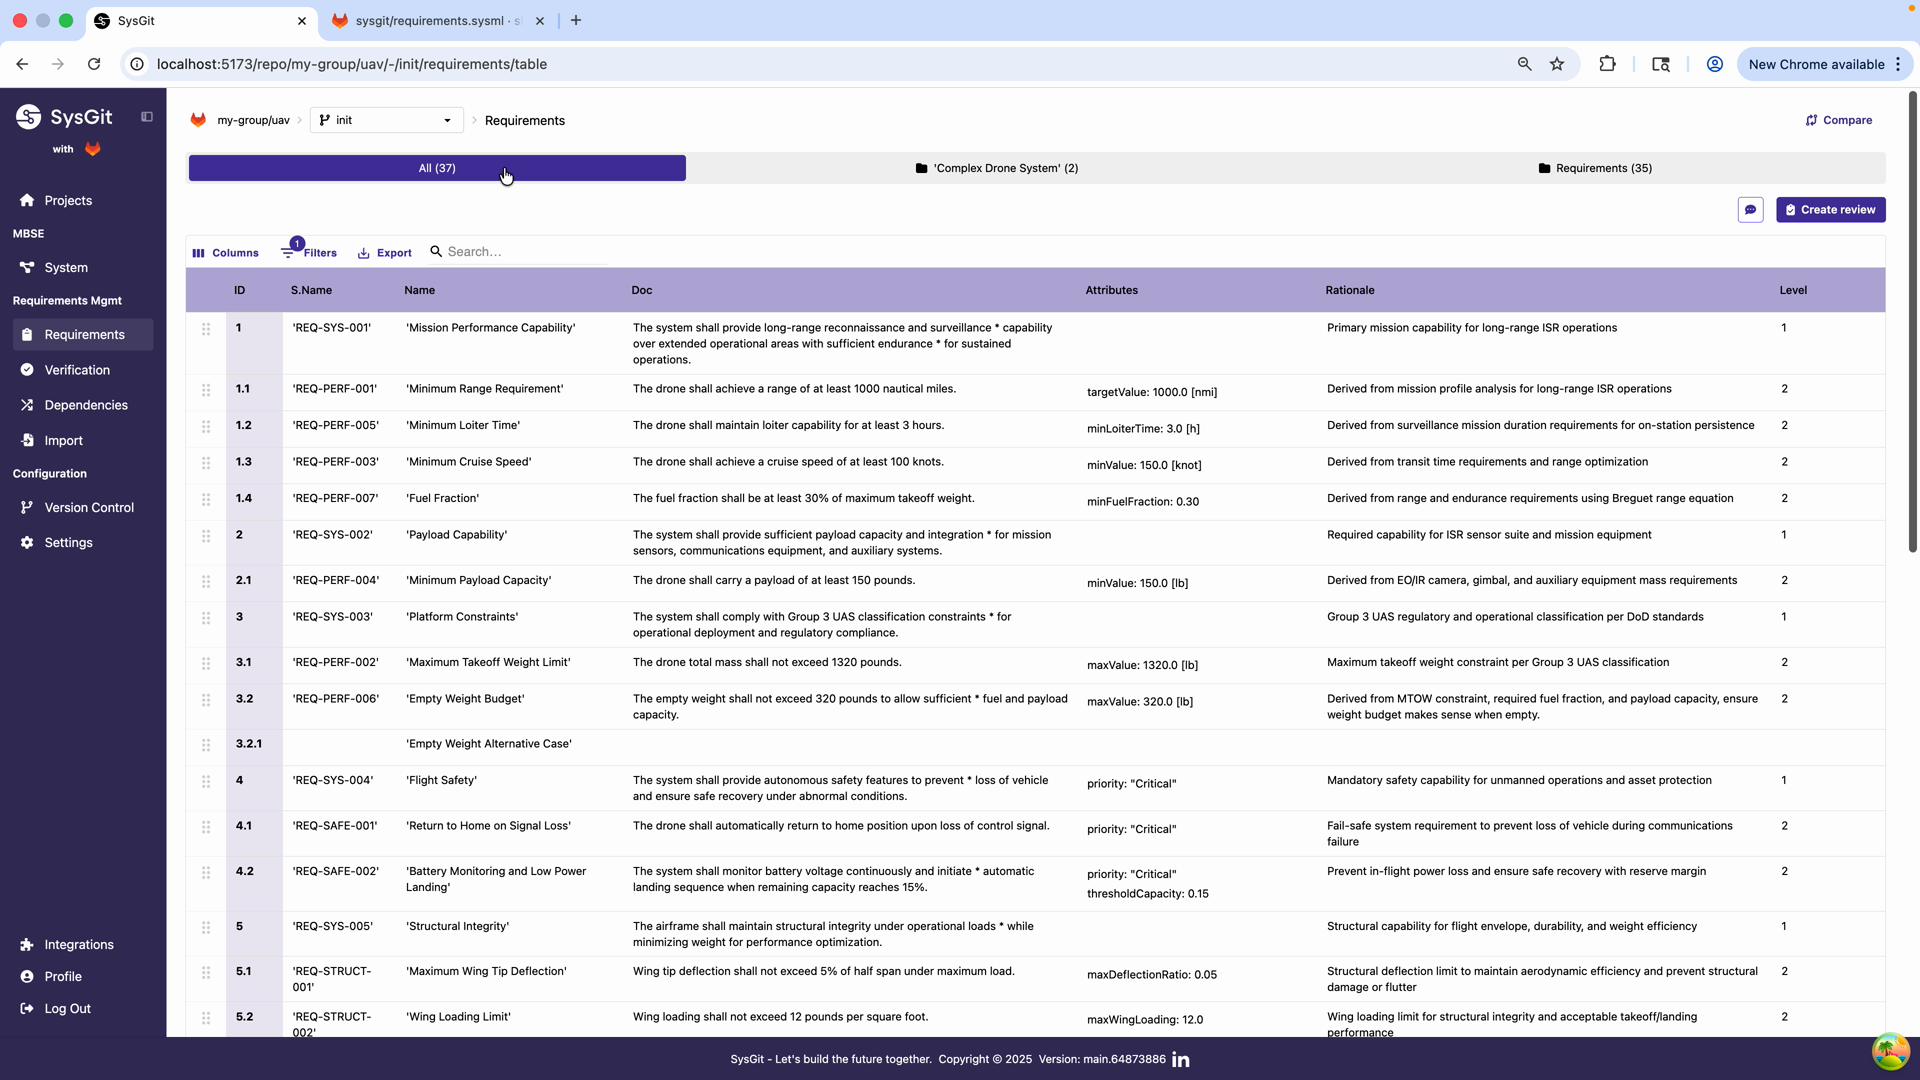
Packages are container objects that group related model elements. The requirements table shows "All (37)" indicating the total number of requirements, with options to filter by package.
In SysML v2, packages serve multiple purposes:
Namespace organization: Group related elements together logically Reusability: Packages can be shared across projects or imported into other models Access control: In multi-repository setups, packages can map to repository boundaries Team organization: Different teams can work primarily in their own packages Scalability: Large models with thousands of elements remain navigable
Creating Package Structures#
Organize your model with a clear package hierarchy:
package ProgramName {
    package Requirements {
        package MissionRequirements {
            requirement 'Mission Range' { /* ... */ }
            requirement 'Mission Duration' { /* ... */ }
        }

        package PerformanceRequirements {
            requirement 'Maximum Speed' { /* ... */ }
            requirement 'Climb Rate' { /* ... */ }
        }

        package SafetyRequirements {
            requirement 'Fault Tolerance' { /* ... */ }
            requirement 'Emergency Landing' { /* ... */ }
        }
    }

    package System {
        package Propulsion {
            part 'Propulsion System' { /* ... */ }
        }

        package Avionics {
            part 'Flight Control System' { /* ... */ }
        }
    }

    package Verifications {
        package GroundTests {
            verification 'Static Load Test' { /* ... */ }
        }

        package FlightTests {
            verification 'Performance Flight Test' { /* ... */ }
        }
    }
}
Package Organization Strategies#
By discipline: Organize by engineering discipline
package Requirements {
    package Electrical { /* ... */ }
    package Mechanical { /* ... */ }
    package Software { /* ... */ }
    package Systems { /* ... */ }
}
By subsystem: Mirror physical architecture
package Requirements {
    package Propulsion { /* ... */ }
    package Avionics { /* ... */ }
    package Structures { /* ... */ }
}
By work breakdown structure: Match program WBS
package Requirements {
    package WBS_1_1_Airframe { /* ... */ }
    package WBS_1_2_Propulsion { /* ... */ }
    package WBS_1_3_Avionics { /* ... */ }
}
By contract deliverable: Organize by customer requirements
package Requirements {
    package CDRL_A001_SystemSpec { /* ... */ }
    package CDRL_A002_TestPlan { /* ... */ }
}
Hybrid approach: Combine strategies as appropriate
package Requirements {
    package SystemLevel {
        package Mission { /* ... */ }
        package Performance { /* ... */ }
    }

    package SubsystemLevel {
        package Propulsion { /* ... */ }
        package Avionics { /* ... */ }
    }
}
Package Best Practices#
Keep packages focused: Each package should have a clear, single purpose. Avoid "miscellaneous" packages that become dumping grounds.
Use descriptive names: Package names should clearly communicate their contents. "Mission Requirements" is better than "Requirements 1".
Limit nesting depth: Two to three levels of package nesting is usually sufficient. Deeper nesting becomes hard to navigate.
Document package purpose: Add comments explaining what belongs in each package and why:
package PerformanceRequirements {
    /*
     * Contains all performance-related requirements including:
     * - Speed and acceleration
     * - Range and endurance
     * - Climb and ceiling
     * - Maneuverability limits
     */

    requirement 'Maximum Speed' { /* ... */ }
}
Align with team structure: If possible, let each team "own" their package(s). This reduces merge conflicts and clarifies responsibility.
Filtering by Package#
In the Requirements Table, use package filters to focus on specific subsets:
- Click the package dropdown showing "All (37)"
- Select a specific package to see only requirements in that package
- Work within that filtered view
- Switch packages as needed
This is particularly valuable during: - Requirements reviews: Focus on one area at a time - Team meetings: Show only requirements relevant to that team - Customer deliverables: Filter to requirements for specific contract line items - Milestone reviews: Focus on requirements for the current development phase
Package References#
Reference elements in other packages using the :: operator:
// In the Verifications package
verification 'Speed Test' {
    objective {
        verify Requirements::Performance::'Maximum Speed';
    }
}
This explicit package qualification ensures the correct element is referenced even if similar names exist in multiple packages.
Customizable Table Columns#
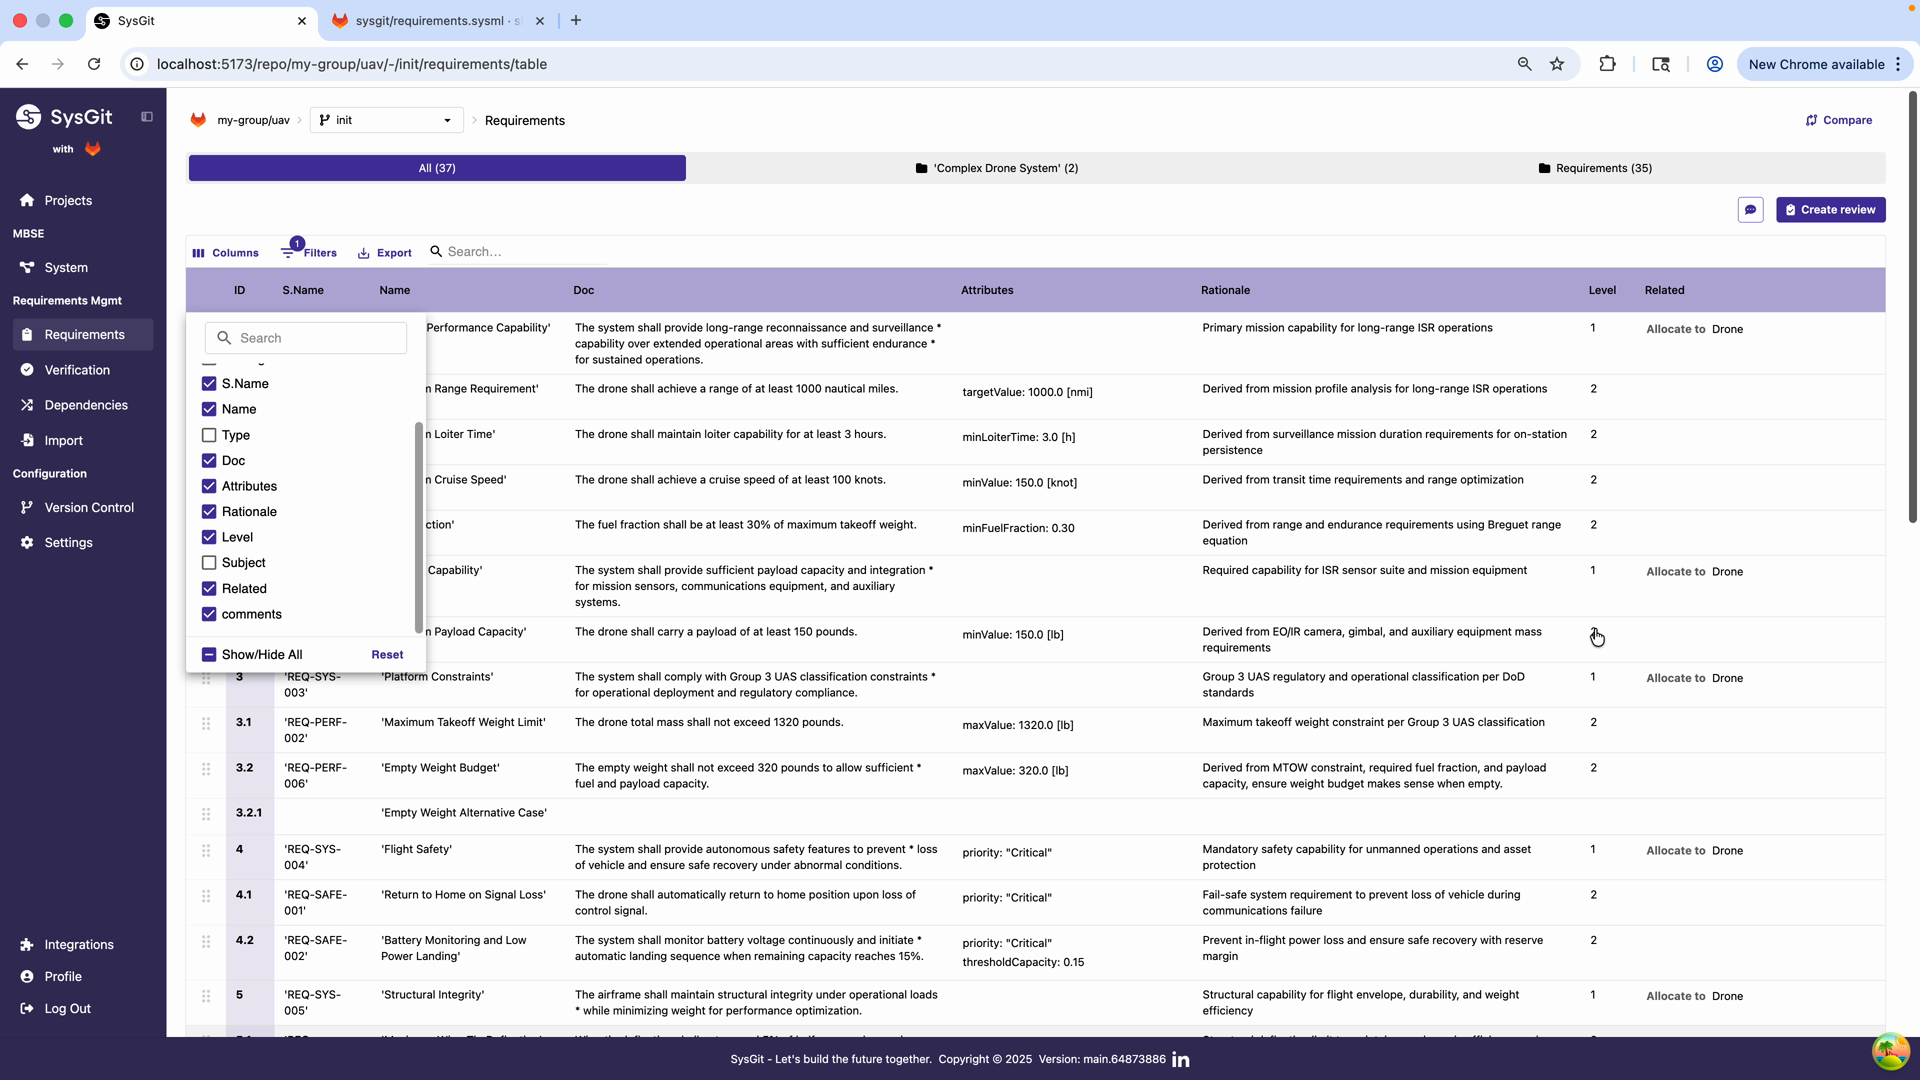
SysGit's tables are highly customizable, allowing different users and workflows to focus on the information most relevant to them. The column selector provides extensive control over what's displayed.
Available Columns#
The Requirements Table supports numerous columns:
Core Identification: - ID: Hierarchical position identifier (1, 1.1, 1.2, etc.) - S.Name: Short name identifier (REQ-SYS-001) - Name: Full requirement name
Content: - Doc: Documentation text (the "shall" statement) - Type: Requirement classification - Attributes: Parameter values with units - Rationale: Engineering justification
Metadata: - Level: Hierarchy depth (1, 2, 3, etc.) - Subject: Custom categorization field - Comments: Annotations and notes
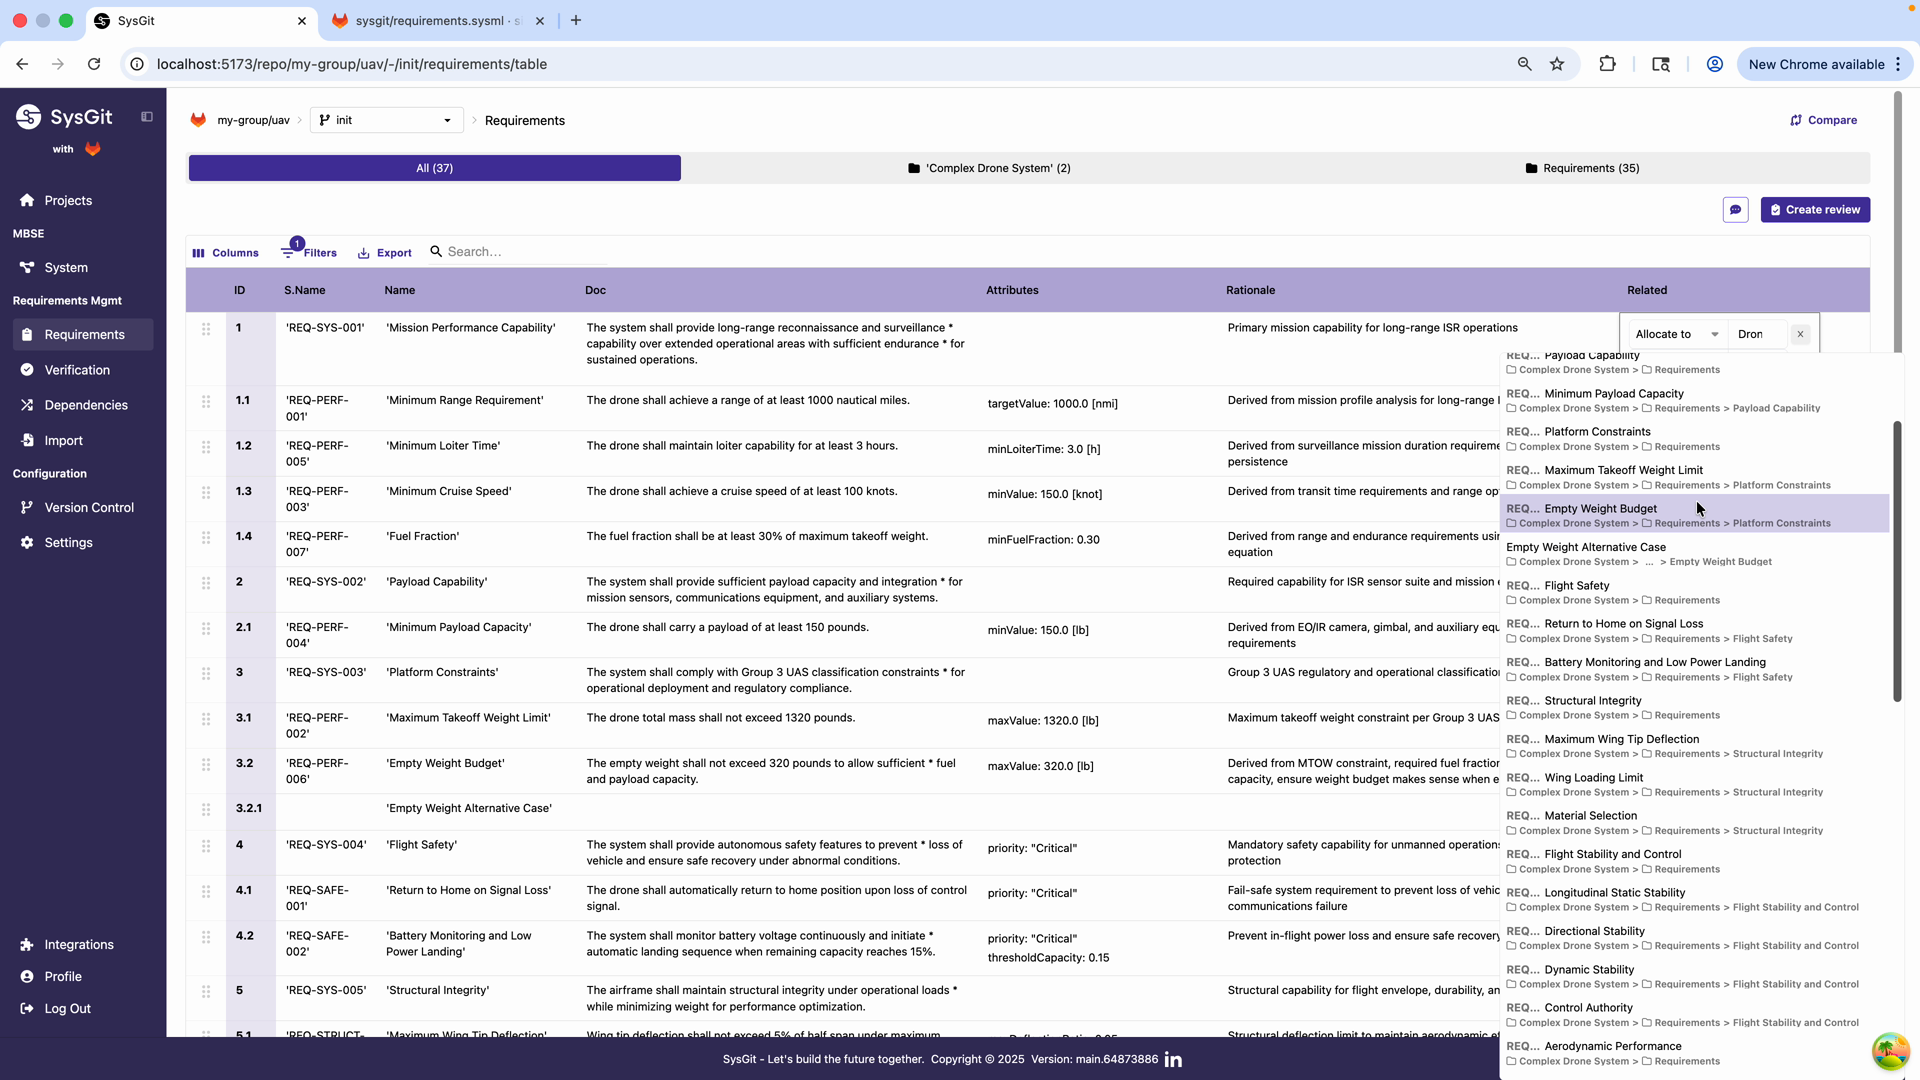
Relationships: - Related: Links to other model elements - Verifies: Verification relationships - Allocations: Allocation relationships
Status and Tracking: - Status: Development status (Draft, Approved, Implemented, etc.) - Priority: Importance ranking - Owner: Responsible engineer or team
Configuring Columns#
To customize which columns appear:
- Click the Columns button in the table toolbar
- Check/uncheck columns to show/hide them
- Drag columns to reorder (in some views)
- The configuration persists for your session
Role-Based Column Configurations#
Different roles benefit from different column sets:
Systems Engineers: - Show: ID, Name, Doc, Attributes, Rationale, Related - Focus: Content and relationships
Requirements Managers: - Show: ID, S.Name, Name, Level, Status, Owner - Focus: Identification and tracking
Test Engineers: - Show: ID, Name, Attributes, Related (filtered to verifications) - Focus: What needs testing and with what criteria
Program Managers: - Show: ID, Name, Status, Priority, Owner - Focus: Progress and assignments
Customer Representatives: - Show: ID, Name, Doc, Rationale - Focus: Requirement content and justification
Using the Level Column#
The Level column displays the hierarchical depth of each requirement:
- Level 1: Top-level system capabilities and constraints
- Level 2: Derived requirements decomposed from level 1
- Level 3: Further refinement and detailed specifications
- Level 4+: Component-level requirements (if needed)
This visualization helps: - Understand requirement decomposition structure - Verify appropriate abstraction at each level - Ensure requirements flow from general to specific - Identify potential over-decomposition (too many levels)
Best practice: Most aerospace programs operate with 2-4 levels. Level 1 requirements come from customers or mission needs. Level 2 requirements come from systems engineers breaking down those needs. Level 3-4 requirements come from subsystem engineers detailing implementation specifics.
Custom Fields#
The Subject and Comments fields provide flexibility for program-specific needs:
Subject examples: - Requirement source: "Customer", "Derived", "Regulatory", "Internal" - Development phase: "Concept", "Preliminary Design", "Detailed Design" - Verification readiness: "Ready to Test", "Test in Progress", "Verified" - Risk category: "High Risk", "Medium Risk", "Low Risk"
Comments examples: - Design notes: "Consider alternative materials for weight reduction" - Review feedback: "Customer requested clarification on nominal case" - Implementation status: "Waiting on vendor data for analysis" - Historical context: "This requirement added in response to finding #42"
These fields enable program-specific workflows without modifying SysGit itself.
Hierarchical Requirements Management#
Complex requirements often decompose into multiple levels. SysGit provides powerful tools for managing hierarchical requirements structures.
Creating Hierarchies#
Requirements can be nested to show decomposition:
Method 1: Inline nesting (in code view):
requirement <'SYS-001'> 'Mission Performance' {
    doc /* Top-level mission performance envelope */

    requirement <'PERF-001'> 'Maximum Range' {
        doc /* System shall achieve 500 nm range */
        attribute range : LengthValue = 500.0 [nm];
    }

    requirement <'PERF-002'> 'Maximum Speed' {
        doc /* System shall achieve 100 knots cruise speed */
        attribute speed : SpeedValue = 100.0 [knots];
    }
}
Method 2: Table grouping (in table view): 1. Create requirements at the same level 2. Select multiple rows (Shift+click or Cmd/Ctrl+click) 3. Right-click and choose "Group Row" 4. First selected requirement becomes parent 5. Others become children
Working with Hierarchies#
Expanding/collapsing: In table view, click the arrow next to parent requirements to expand/collapse children. This helps navigate large requirement sets.
Moving groups: When you move a parent requirement, all children move with it. The entire hierarchy stays together.
Ungrouping: Right-click any member of a group and select "Ungroup" to flatten the structure. Children return to the same level as the parent.
Multi-level hierarchies: Groups can contain groups, creating 3+ level structures. Use this for complex decomposition:
1. Mission Performance
  1.1 Range Requirements
    1.1.1 Cruise Range
    1.1.2 Loiter Range
  1.2 Speed Requirements
    1.2.1 Maximum Speed
    1.2.2 Cruise Speed
    1.2.3 Minimum Speed
Automatic ID Numbering#
SysGit automatically manages hierarchical IDs: - Level 1: 1, 2, 3, 4... - Level 2: 1.1, 1.2, 2.1, 2.2... - Level 3: 1.1.1, 1.1.2, 1.2.1... - And so on
When you move requirements or change hierarchy, IDs update automatically to maintain correct sequence. This eliminates manual ID management and renumbering.
Hierarchy Best Practices#
Meaningful levels: Each level should represent a meaningful refinement or decomposition. Don't nest just to nest.
Consistent abstraction: Requirements at the same level should be at similar abstraction. Don't mix high-level mission requirements with detailed component specifications at the same level.
Limit depth: Three to four levels is usually sufficient. Deeper hierarchies become difficult to understand and navigate.
Clear parent-child relationships: Child requirements should clearly decompose or refine the parent. If the relationship is unclear, consider restructuring.
Document decomposition rationale: In the parent requirement's rationale, explain why it decomposes the way it does.
Advanced Table Operations#
Bulk Editing#
Make consistent changes across multiple requirements:
- Select multiple rows (Shift+click for range, Cmd/Ctrl+click for individual)
- Edit a field—the change applies to all selected rows
- Useful for:
- Setting the same rationale for related requirements
- Assigning the same owner to a work package
- Updating status for completed requirements
- Allocating a group of requirements to the same part
Example: Select all propulsion requirements and bulk-edit their Related column to allocate them all to the Propulsion System.
Copy and Paste#
Duplicate similar requirements:
- Select one or more requirements
- Copy (Cmd/Ctrl+C)
- Click where you want to insert
- Paste (Cmd/Ctrl+V)
- Edit the pasted requirements as needed
This is faster than creating from scratch when requirements follow similar patterns. For example, if you have 10 similar sensor requirements differing only in sensor type and parameters, create the first one carefully, then copy and modify.
Keyboard Navigation#
Efficient keyboard users can navigate and edit without touching the mouse:
- Arrow keys: Move between cells
- Enter: Start editing current cell
- Tab: Move to next editable cell, save current
- Shift+Tab: Move to previous editable cell
- Escape: Cancel editing
- Cmd/Ctrl+S: Commit changes (save to Git)
Learn these shortcuts to dramatically increase editing speed.
Filtering and Sorting#
Use table controls to focus on subsets:
Filter by text: Type in the search box to show only matching requirements Filter by column value: Click column headers to filter by specific values Sort by column: Click column headers to sort ascending/descending Multi-column sort: Shift+click headers to sort by multiple columns
These filters don't change the model—they just control what you see. Perfect for focused work sessions or generating specific views for exports.
Navigating Between Views#
SysGit's three views—Table, Graph, and Code—each have strengths. Power users fluidly switch between them based on the task.
When to Use Table View#
Best for: - Rapid data entry of multiple requirements - Bulk editing common fields - Reviewing requirements in list format - Sorting and filtering by attributes - Exporting to spreadsheets - Stakeholders comfortable with Excel-like interfaces
Workflows: - Initial requirements capture from documents or stakeholders - Requirements reviews with checklist-style evaluation - Status updates during program execution - Generating filtered requirement sets for deliverables
When to Use Graph View#
Best for: - Understanding system structure and relationships - Visual presentations and design reviews - Exploring traceability connections - Identifying orphaned requirements - Understanding requirement decomposition visually - Stakeholders who prefer visual representations
Workflows: - Architecture reviews showing requirement allocations - Verification coverage presentations - New team member onboarding (seeing "the big picture") - Finding related requirements through visual navigation - Identifying interface requirements (requirements connecting multiple parts)
When to Use Code View#
Best for: - Advanced users comfortable with SysML v2 syntax - Bulk creation through typing and copy-paste - Making precise structural changes - Understanding exact model representation - Complex relationship definitions - Review of Git diffs and merge conflicts
Workflows: - Experienced modelers creating many requirements quickly - Migration from other tools (paste and adapt syntax) - Review of pull requests and model changes - Debugging relationship or hierarchy issues - Creating reusable requirement templates
Fluid Navigation Pattern#
Power users develop patterns like:
- Create in Table: Rapidly enter basic requirement information
- Refine in Code: Add complex relationships or attributes with precise syntax
- Review in Graph: Verify structure looks correct and relationships are established
- Present in Graph: Show stakeholders the architecture
- Edit in Table: Make content updates based on feedback
- Commit from Code: Review diff to verify exactly what's changing
This multi-view approach leverages each interface's strengths.
Review and Commit Workflows#
Review Before Commit#
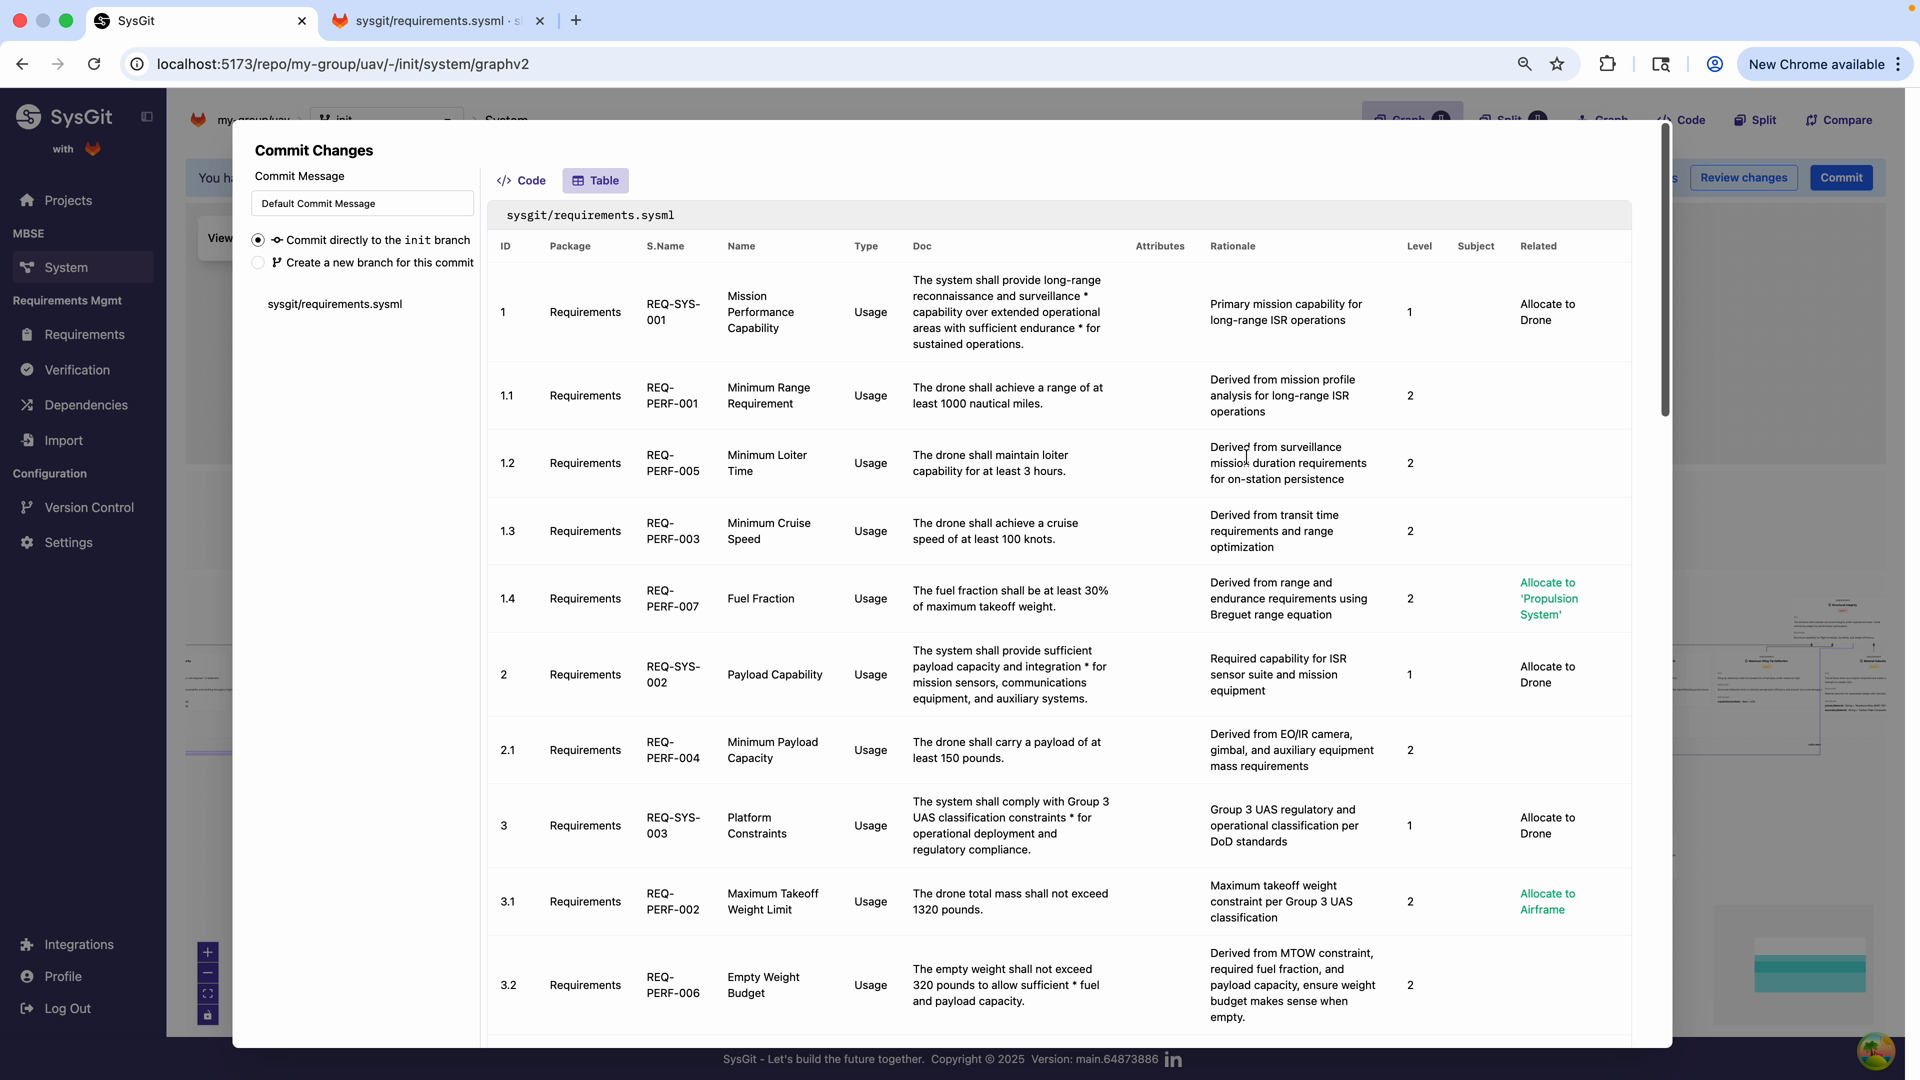
Always review changes before committing:
- Click Review Changes or Commit button
- Review in Table tab: See changes in familiar format
- Review in Code tab: See exact SysML v2 changes
- Verify changes are correct
- Write descriptive commit message
- Commit
The dual-view review catches errors: - Table view: Catches content errors (wrong values, typos in documentation) - Code view: Catches structural errors (incorrect syntax, unintended relationship changes)
Writing Good Commit Messages#
Commit messages create your project's history. Make them useful:
Bad commit messages: - "Updated requirements" - "Changes" - "asdf" - Empty message
Good commit messages: - "Add thermal requirements for battery cooling system" - "Allocate propulsion requirements to engine and fuel subsystems" - "Update range requirement from 500 nm to 750 nm per customer request" - "Fix allocation relationships in flight control requirements"
Best practices: - First line: Brief summary (50 chars or less) - Optional second paragraph: Detailed explanation - Reference issue numbers if applicable ("Fixes #42") - Explain why, not just what - Use imperative mood ("Add requirement" not "Added requirement")
Branching for Experiments#
Use Git branches for experimental changes:
- Create a branch for the experiment
- Make changes in the branch
- Review and test
- If successful: merge back to main branch
- If unsuccessful: delete branch, keep main unchanged
Example scenarios: - "Trying different requirement decomposition structure" - "Exploring alternative system architecture" - "Proposing requirement changes for customer review" - "Developing detailed requirements for preliminary design review"
Branches are cheap and safe. Use them liberally.
Pull Requests for Review#
In team environments, use pull requests (or merge requests in GitLab):
- Create branch for your work
- Make and commit changes
- Open pull request to merge into main
- Team reviews changes in both table and code views
- Discuss and refine
- Merge when approved
This workflow: - Ensures changes are reviewed before entering baseline - Creates discussion threads around specific changes - Documents why decisions were made - Maintains model quality through peer review
Multi-Organization Patterns#
Large programs often involve multiple organizations working together. SysGit's Git-based approach enables sophisticated multi-org workflows.
Repository per Organization#
Pattern: Each organization maintains their own repository
Prime Contractor:
prime-requirements-repo/
  ├── system-level-requirements/
  ├── interface-requirements/
  └── verification-plans/
Subcontractor A:
subcontractor-a-repo/
  ├── allocated-requirements/  (subset from prime)
  ├── derived-requirements/    (their additions)
  └── subsystem-design/
Benefits: - Each org controls access to their repository - IP protection through repository boundaries - Organizations work independently - Common interfaces in shared repositories
Interface Repositories#
Pattern: Shared repository for interfaces only
interface-definitions-repo/
  ├── electrical-interfaces/
  ├── mechanical-interfaces/
  ├── control-interfaces/
  └── data-interfaces/
All organizations have read access. Write access controlled through pull requests reviewed by systems engineering.
Requirement Flowdown Model#
- Prime contractor creates system requirements
- Prime allocates requirements to subsystems
- Each subcontractor receives allocated requirements
- Subcontractors derive detailed requirements in their repositories
- Subcontractors link back to prime requirements through references
Example:
// In prime repository
requirement <'SYS-042'> 'Battery Capacity' {
    doc /* Power system shall provide 5 kWh total capacity */
    attribute capacity : EnergyValue = 5.0 [kWh];
}

// In subcontractor repository
requirement <'PWR-010'> 'Battery Pack Capacity' {
    doc /* Derives from SYS-042. Battery pack design shall provide 5 kWh. */

    // Reference to prime requirement
    metadata {
        primeRequirement = "prime-repo::Requirements::'Battery Capacity'";
    }
}
Change Coordination#
When prime requirements change: 1. Prime commits change to their repository 2. Automated notification sent to affected subcontractors 3. Subcontractors review impact on their derived requirements 4. Subcontractors update their models 5. Subcontractors confirm compliance through pull request back to prime
This workflow maintains traceability while preserving organizational independence.
Exporting and Reporting#
While SysGit focuses on model-based work, traditional reports are still necessary for reviews and deliverables.
Exporting Tables#
Export any table view to common formats:
- Configure table columns for the report
- Apply filters to show relevant subset
- Click Export button
- Choose format (CSV, Excel, PDF)
- Use exported file in other tools
Use cases:
- Requirements matrices for customer deliverables
- Verification status reports for program reviews
- Allocation matrices for subsystem teams
- Change logs for configuration management
Generating Traceability Reports#
Export dependency matrices:
- Configure matrix (Requirements vs Parts, Requirements vs Verifications, etc.)
- Export to spreadsheet
- Add formatting and analysis as needed
- Include in formal documentation
Automated Reporting#
For recurring reports, use SysGit's API (covered in API Reference) to automate extraction:
# Example: Extract all requirements and their allocations
import sysgit

model = sysgit.load_model('requirements.sysml')
requirements = model.find_all(type='requirement')

for req in requirements:
    print(f"{req.short_name}: {req.name}")
    for allocation in req.allocations:
        print(f"  -> {allocation.target}")
Automated extraction enables: - CI/CD generation of status reports - Custom analysis and metrics - Integration with other program tools - Consistent report formatting
Advanced Search and Filtering#
Global Search#
Use SysGit's search functionality to find elements across the entire model:
- Search by name
- Search by short name
- Search by content in documentation
- Search by attribute values
This is invaluable in large models where manual navigation is impractical.
Cross-Reference Search#
Find all references to a specific element: - Where is this requirement allocated? - What verifications address this requirement? - What other requirements reference this part?
Graph view makes this visual, but search provides text-based lists.
Pattern-Based Filtering#
Filter requirements matching patterns: - All requirements with no verification - All requirements allocated to a specific part - All requirements at a specific level - All requirements owned by a specific team
Use these filters to generate targeted work lists.
See Also#
- Requirements Management: Foundation for advanced requirements work
- Verification Management: Verifications in complex scenarios
- Traceability: Advanced traceability patterns
- System Modeling: Complex system architectures
- Advanced Authoring: Direct SysML v2 authoring techniques
- SysML v2 Language Reference: Complete language syntax
- Git Workflows: Branching, merging, and collaboration patterns
- Multi-Org Collaboration: Enterprise collaboration strategies